This post intend to explain how I create multiple xLights layouts that allocate our different yearly events RGB display formats. Plus a few tips on how to organize your show folder a little more efficiently.
If you are anything like me and you have different props for each of your yearly station RGB display and use the same controller for all of those props, then this is the video for you as we will be discussing how to create a second or third layout in xLights and how to permanently select it as your Seasonal Show Directory.
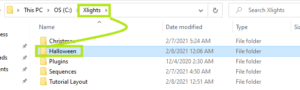
Let’s start by locating your show folder, mine has been purposely located in the C: (root) xLigths (folder).
As you can see I have a few folders;
- My Christmas show folder with all the xLights Christmas RGB display show information.
- The Halloween show folder with all the xLights Halloween RGB display show information.
- The Plugins folder with all the xLights Plugins.
- The Sequence folder that’s there just for video tutorial purposes as you may have all your sequences on this same folder.
*** And this remember me of Tip #1.
xLights like any other program will search for its data on the folders the program has created, Since xLights at times gets upset with long file paths and long names I do minimize the folder and subfolder organization minimizing its file path length. Tip: Keep it clean, simple and organized. The guys at the Zoom room will be thankful!
Let’s take a look at what’s inside the Halloween folder,
Backup => Have all the xLights auto backup data.
Colorcurves => Have the color curve data. Empty unless you manually save the data from the Sequencer.
Faces => Have the faces files used on the props sequencing.
Music => Have the music file used on the sequence.
Palettes => Have thePaletts data. Empty unless you manually save the data from the Sequencer.
Sequences => Have all the Halloween xLights sequences.
Valuecurves => Have the value curves data. Empty unless you manually save the data from the Sequencer.
xScheduleData => Have all the xSchedule data. Empty unless you use xSchedule to run your show.
Home.jpeg => The layout picture. This helps with the prop layout.
Xlights_keybindings.xml => This are the xLights shortscuts, include the ones you have created.
xLights_networks.xml => This is your controller information.
xLights_rgbeffects.xbkp => This is the Layout data. Props location, how many channels, ect.
xLights_rgbeffects.xml => Sequence creation data.
These last 4 files are the most important ones as they contain all your controller and layout data.
Making things simple, the following spread sheet has been created. It spoke by it self do no much to explain.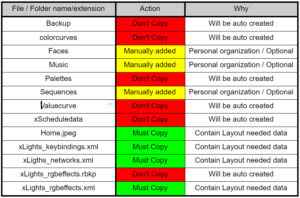
Now that we have a better understanding how some of these xLights files will affect the layout, we can easily decide which files the new show folder must contain. Bet the spreadsheet makes sense now!
Let’s create that new Show Folder and copy those files over!!!
Be sure that you are in your xLights root folder.
Create a new show folder;
**Left Click on the white empty space. Then, right click, select New, then select Folder.
Edit the new folder name using your desired description. In this case I will use “Tutorial Layout”.
- Return to open your xLight root folder that contains your current xLights layout information. In my case, “Halloween”.
- Select the “Must copy” files previously discussed using the spreadsheet above,
- Click once on top of the desired file.
- Then right click and select copy. In this case, I just batch select and copy.
Tip** The copy function can also be done using the Ctrl+c shortcut.
- Return to your xLight root folder and open the recently created new show folder.
- Open the new show folder we just created and use right click to select Paste.
Tip** This can also be done using the shortcut Ctrl+v.
Your file should look like this.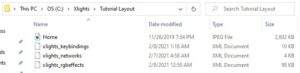
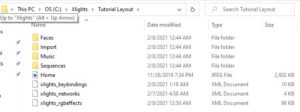
Create the “Manually add” folders previously discussed on the spreadsheet following the instructions on Step 2.
 If you decided to manually
add the optional folders as I do,
your folder must look like this.
Keep in mind that these folders will not have any data on them as you will be creating that data as you adjust your new layout, props, controller ports, and channels.
Now let’s see the results of our efforts;
1- Let’s open the xLights program.
- On the Controllers tab, locate your Show Director
Pay attention to the Controllers setup area, Is that info familiar? If Yes.
a) Select Change Permanently;
b) Once the Select Show Directory windows pop’s up;
c) Select the New Show Folder we just create; On my case it’s the “Tutorials Layout”
d) At the bottom click Select Folder.
Notice that the Show Directory route has been changed to the new folder we just created.
- Select the Layout Tab and verify that all data there is:
- Groups and Single Props.
- Your JPEG file
- And your layout Preview looks familiar.
Now from here and forward, it’s up to your pocket of imagination!
Change and moves things around and do not forget to Save the Layout
- File (at top left), Save Layout (4th row down at drop downed box) or by using the shortcut Ctrl+S
As always I do hope this tutorial was helpful!
Please let me know in the comments how it works for you or any questions that may surface. I would like to start creating an xLights for beginners community. Your comments, critiques, and ideas are always welcome.
Be safe and I’ll see you in the next blink!

Leave a Reply